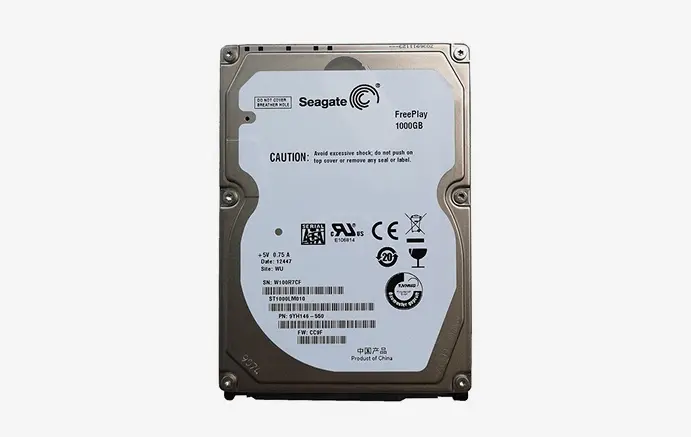
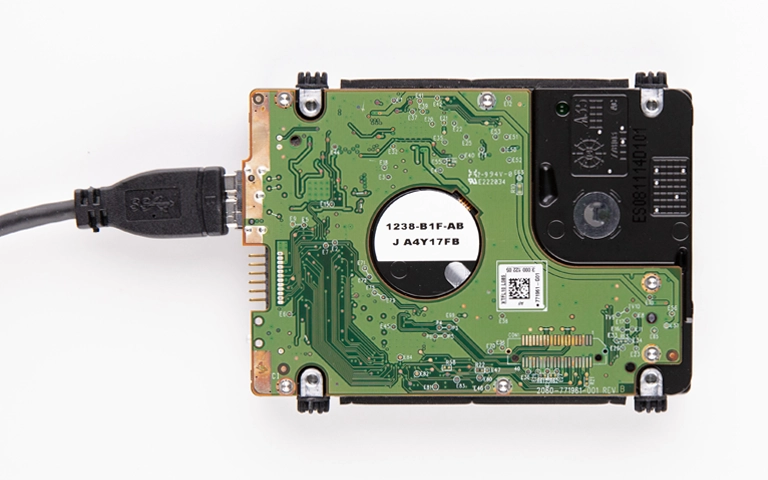
When a Seagate FreePlay drive fails at the electronics level, the problem is rarely “just a cable” or “just software.” A PCB failure can stop the drive from communicating with any computer, even when the internal media is still intact.
This case study breaks down what a PCB failure looks like in the real world, what we validated during intake, and the exact recovery workflow used to re establish stable access without introducing additional risk.
If you are dealing with a Seagate drive that is not showing up, this will help you map symptoms to the right next move.
What Went Wrong: PCB Failure and Key Symptoms
A PCB failure is an electronic level fault on the drive’s printed circuit board. When it fails, the drive may stop initializing correctly, which blocks normal access to the data.
What the client typically sees with this failure type
Drive not showing up in the operating system
No reliable detection in BIOS or Disk Management
Intermittent power up behavior, inconsistent spin, or unstable connection
Access attempts that go nowhere even after swapping cables or ports
What is at risk
Repeated power cycles can worsen electronic instability
Incorrect PCB swaps can create mismatch conditions
Firmware inconsistency can prevent the drive from coming ready, even if the board is replaced
This scenario pointed to a hardware electronics issue rather than a file system problem. That distinction drives the recovery strategy and determines what should not be attempted at home.
See related cases: Seagate external hard drive clicking.
DIY Recovery
Risks permanent data loss
Let the Specialists Handle It
DIY attempts often result in permanent data loss. Our certified recovery specialists use advanced tools in controlled environments for the highest success rate.
24/7 Emergency Service
Diagnostic Highlights: What We Checked First
When a Seagate drive will not show up, the fastest way to lose time is to guess. The first phase is about separating an electronics fault from everything else, without stressing the drive.
What we validated immediately
- Is the issue external (port, cable, enclosure) or internal to the drive?
- Does the drive behave consistently when powered, or does it act unstable?
- Are there any visible red flags that would change handling priorities?
What we focused on next: the PCB
- Board identifiers and manufacturing details to confirm we are working with the correct electronics family
- Component level indicators that point to an electrical fault rather than file system corruption
- Signals that the drive is failing at the communication layer, not at the “data on disk” layer
If the PCB is the real blocker, “software fixes” and repeated reconnect attempts do not move the needle. The right move is to validate board compatibility and firmware continuity before any serious read attempt.

Controlled Recovery Process
Step 1: Correct PCB selection
- Matched the replacement PCB to the original drive’s specifications and board identifiers
- Ensured compatibility at the electronics and revision level, not “looks similar” matching
Step 2: Firmware continuity
- Transferred the required firmware elements from the original PCB to the replacement board
- Goal: make the drive initialize correctly with its own adaptive information
Step 3: Controlled access and read
- Connected the drive to specialized recovery equipment for managed power and communication
- Confirmed stable initialization before any data handling
- Read data in a controlled manner designed to minimize stress and avoid unnecessary retries
If you swap a random PCB or skip firmware transfer, you can create a mismatch that blocks access or escalates damage.
Your Data Security Is Our Priority
Data privacy isn’t optional. It’s our commitment. Our secure recovery process ensures your sensitive information stays protected from start to finish.
HIPAA Compliant
GDPR Compliant
Secure Facility
NDA Available
Trust in certified security. Start your recovery today! Call Now: 888.611.0737
Outcome and Data Verification Session
Once stable access was established, we moved to controlled extraction and client validation.
What was prioritized
- High value folders and business critical files first
- A structured pull sequence to avoid unnecessary drive workload
Verification method
A scheduled verification session where the client reviewed the recovered data by connecting to our servers
Confirmed file visibility and integrity before final delivery steps
Delivery
Final data set packaged for transfer after verification sign off
Case documentation aligned to chain of handling expectations
Don't Let Data Loss Ruin Your Business
Minimize business disruption. We retrieve lost data fast, so you can focus on what matters.
Risk Notes: What Not to Do After a PCB Failure
PCB failures are not a DIY scenario. These are the moves that usually escalate damage:
- Stop repeated power cycling and reconnect attempts.
- Do not swap in a random “same model” PCB. Revisions matter.
- Do not skip firmware transfer. Without it, the drive may never initialize.
- Avoid repair utilities until the drive communicates reliably.
Read more: Seagate external hard drive data recovery.

Contact Us for Seagate PCB Failure Recovery
Your Seagate drive is not showing up. The fastest win is to stop trial and error and move to controlled diagnostics.
Start a recovery request now
- Share the model, capacity, and exact symptoms
- Mention any trigger event (surge, drop, overheating)
Explore our Seagate hard drive recovery service.
Get a Free Consultation.
Our recovery experts are ready to assess your device and guide you through the safest path to recovery. Fill out the form to get started.
"*" indicates required fields