CHKDSK is a command-line tool used in Windows operating systems to check for errors on storage devices such as hard disk drives, solid-state drives (SSDs), and USB flash drives. It helps users to identify and fix issues with their storage devices to ensure they function optimally. CHKDSK has several commands, each with its function. In this blog, our team will discuss how to use CHKDSK, the various commands, and their meanings.
What is CHKDSK
CHKDSK, also known as Check Disk, is a system utility offered by Windows OS that checks a volume’s file system integrity and rectifies logical file system issues. This tool is crucial for scanning hard disks for problems like defective sectors, misplaced clusters, interconnected files, and directory issues. Upon execution, CHKDSK attempts to repair these errors, which could otherwise cause data corruption or system instability.
Running CHKDSK can positively impact your device by maintaining hard drive health and performance. It identifies and fixes disk errors, preventing data loss and improving data efficiency. However, CHKDSK addresses logical errors, not physical damage. Frequent use might indicate hardware issues. When CHKDSK is running, especially in fix mode, avoid using the system to prevent further data corruption.
How to Use Commands on CHKDSK
Before we dive into the various CHKDSK commands, let us go over how to use CHKDSK. CHKDSK can be run from the Command Prompt or PowerShell.
- To access the CHKDSK Command Prompt, open the Start menu and type “cmd.” Then, right-click on “Command Prompt” and select “Run as administrator.”
- For PowerShell, open the Start menu, type “PowerShell,” right-click on “Windows PowerShell,” and select “Run as administrator.”
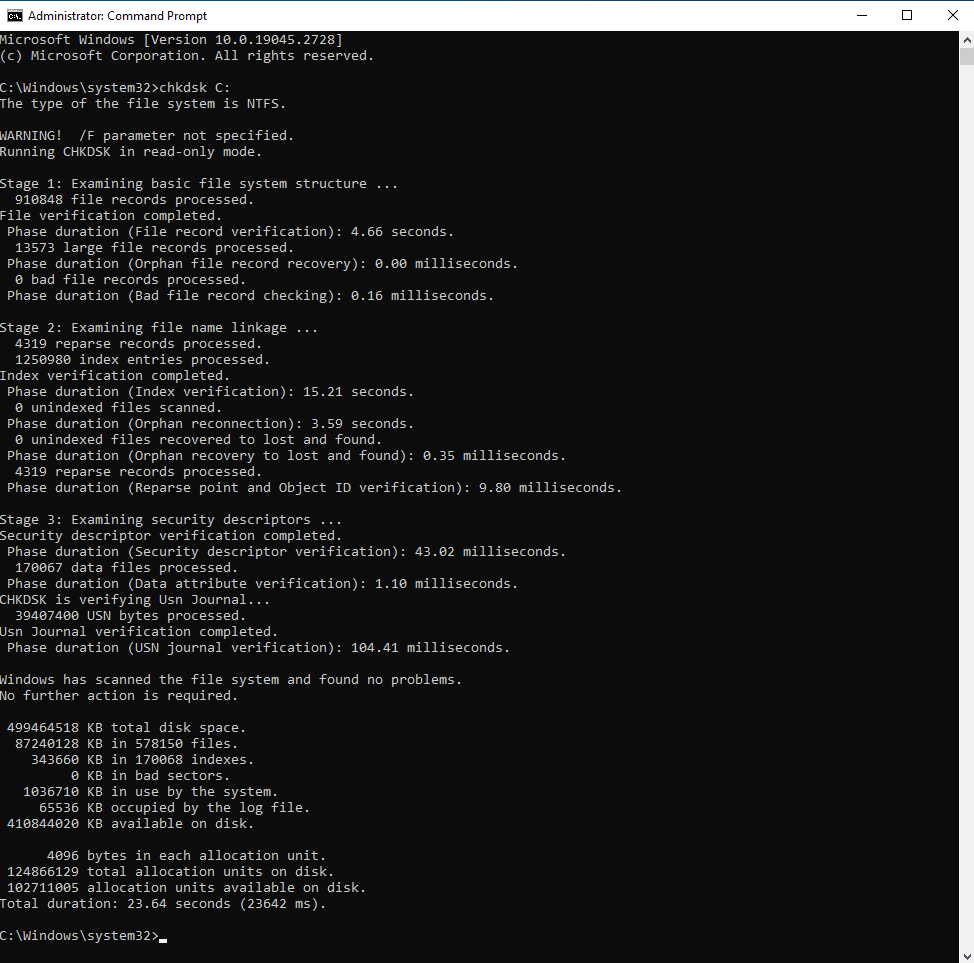
Once you have opened the Command Prompt or PowerShell, type “chkdsk” followed by the letter of the drive you want to check. For example, if you are going to check the C: drive, type “chkdsk C:” and press Enter. CHKDSK will start scanning the drive for errors.
Various CHKDSK Commands on Windows 10 and Their Meanings
CHKDSK has several commands that can be used to customize its behavior. These commands are entered after the drive letter in the CHKDSK command. Here are some of the most common CHKDSK commands and their meanings:
CHKDSK /F Command – Fixes Errors
The “/F” command is used to fix errors on the drive. When this command is used, CHKDSK will scan the drive for errors and attempt to fix them. This command is recommended if you are experiencing issues with your drive, such as file corruption or slow performance. To use this command, type “chkdsk C: /F” (replace “C:” with the letter of the device you want to check and fix) and press Enter.
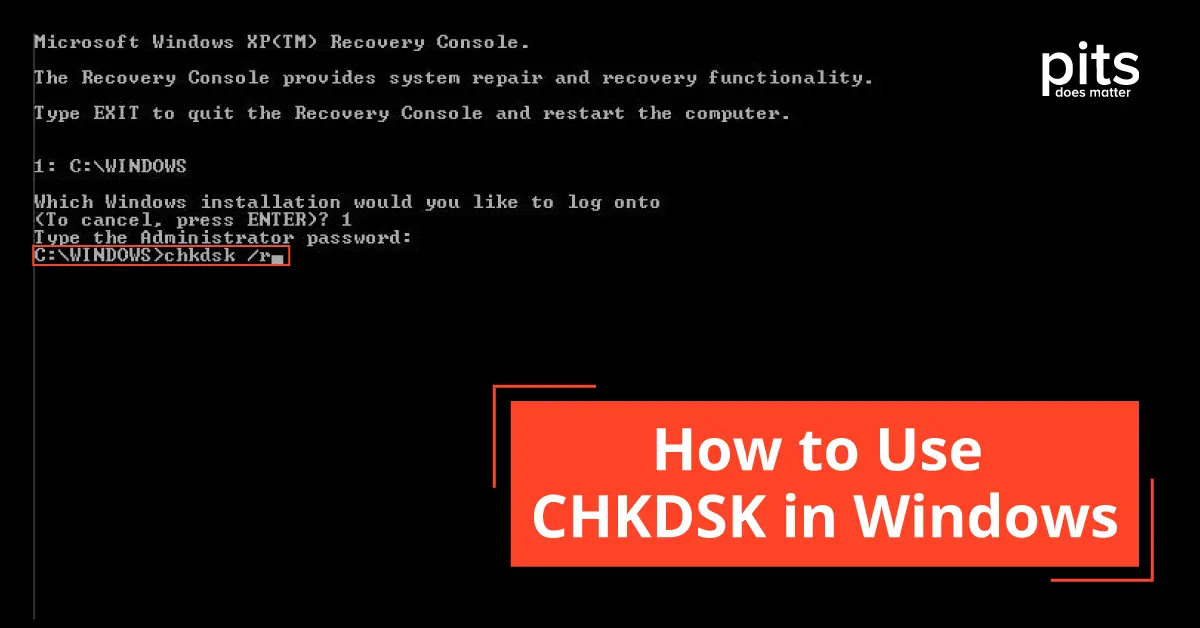
/R – Locates Bad Sectors and Recovers Information
The “/R” command is used to locate bad sectors on the drive and recover available information. Bad sectors are sections of the drive that are physically damaged and cannot be used to store data. When this command is used, CHKDSK will scan the drive for bad sectors and attempt to recover any readable information.
This command can take a long time to run, depending on the size of the drive and the number of bad sectors.
To use this command, type “chkdsk C: /R” (replace “C:” with the letter of the device you want to check and recover information from) and press Enter.
Forces the Drive to Dismount – /X
The “/X” command is used to force the drive to dismount before CHKDSK runs. This command is useful if you are unable to run CHKDSK on a drive because it is currently in use. When this command is used, CHKDSK will ask you if you want to schedule the scan the next time the computer restarts. To use this command, type “chkdsk C: /X” (replace “C:” with the letter of the device you want to force to dismount) and press Enter.
Skips Checking of Cycles within Folder Structures – /C
The “/C” command skips checking cycles within folder structures. When CHKDSK runs, it checks every file and folder on the drive to ensure that they are functioning correctly. However, if there is a cycle within the folder structure (e.g., a folder that contains a shortcut to itself), CHKDSK can get stuck in an infinite loop, which can cause the process to take much longer than necessary.
The “/C” command skips checking cycles, which can speed up the process. To use this command, type “chkdsk C: /C” (replace “C:” with the letter of the device you want to check) and press Enter.
Performs a Check of Index Entries – /I
The “/I” command performs a less rigorous check of index entries. When CHKDSK runs, it checks the index entries of each file and folder to ensure that they point to the correct location on the drive. However, this check can take a long time on larger drives.
The “/I” command performs a less rigorous check, which can speed up the process. To use this command, type “chkdsk C: /I” (replace “C:” with the letter of the device you want to check) and press Enter.
Reevaluates Bad Clusters and Sectors – /B
The “/B” command reevaluates bad clusters and sectors on the drive. When CHKDSK runs, it identifies bad clusters and sectors on the device and marks them as unusable. However, sometimes, a group or sector may be marked as bad incorrectly.
The “/B” command reevaluates these bad clusters and sectors to ensure they are truly bad before marking them unusable. To use this command, type “chkdsk C: /B” (replace “C:” with the letter of the device you want to check) and press Enter.
CHKDSK is an essential tool for ensuring the health and functionality of storage devices in Windows operating systems. It can help identify and fix errors on hard drives, solid-state drives (SSDs), and USB flash drives.
By using the various CHKDSK repair commands, users can customize the behavior of the tool to suit their specific needs. The most common CHKDSK commands are “/F,” “/R,” “/X,” “/C,” “/I,” and “/B.” By understanding these commands, users can better troubleshoot and maintain their storage devices.
Frequently Asked Questions
How to use the CHKDSK command?
To use CHKDSK, open Command Prompt as administrator. Search “cmd” in Windows, right-click Command Prompt, select “Run as administrator.”Then, enter `chkdsk [drive letter]: /f /r` to scan a particular drive, replacing `[drive letter]` with the drive letter you want to check. The `/f` parameter directs CHKDSK to rectify detected errors, while `/r` commands it to search for damaged sectors on the disk and retrieve readable data. Hit Enter to initiate the scan, prompting CHKDSK to examine the drive for errors and repair them as feasible.
Can CHKDSK make things worse?
Running CHKDSK is generally safe, but if there’s physical damage to your hard drive, attempting to repair it could lead to data loss. Always back up critical data before running CHKDSK, especially with the /r parameter.
How long does CHKDSK take to run?
The duration depends on the size of the drive, the amount of data, and the level of damage. A basic scan could be quick, but a thorough check with the /r parameter might take several hours on larger drives.
Can I use my computer while CHKDSK is running?
It’s advisable not to use your computer while CHKDSK is running. This practice helps maintain system integrity and prevent issues. For scans that require the /f parameter, CHKDSK will prompt you to schedule the scan for the next system restart since the drive cannot be in use.
Is CHKDSK enough to fix all types of hard drive errors?
While CHKDSK is effective for fixing logical file system errors, it cannot repair physical damage to a hard drive. If CHKDSK doesn’t resolve your disk issues, consider consulting a professional for hardware-related problems.