The paramount significance of RAID 1 lies in its capacity to provide data redundancy. In a hard drive failure, the mirrored drive seamlessly takes control, ensuring uninterrupted data access without disruption. This redundancy is critical in mission-critical circumstances where downtime or data loss can have severe effects. RAID 1’s straightforward yet efficient mirroring mechanism furnishes an additional safeguard against the unpredictable nature of hardware failures. Additionally, it allows for easy rebuild of RAID 1 after drive failure.
Detecting RAID 1 Hard Drive Failure
Detecting drive failure in RAID 1 is critical to maintaining data integrity and availability in a mirrored storage setup. Understanding signs and symptoms of drive failure, such as performance degradation, frequent I/O errors, or unusual noises from the hard drive, is essential. Recognizing these indicators allows proactive issue resolution before they impact the entire array.
Utilizing monitoring tools, such as RAID management tools and system logs, provides real-time insights into the RAID 1 array’s health. Regularly checking these tools enables prompt issue identification, necessary actions, and potential data loss prevention. Real-world scenarios of drive failures in RAID 1 setups offer valuable insights into associated challenges, recovery steps, and the importance of proactive monitoring. These stories serve as cautionary tales, emphasizing the significance of vigilant detection and timely response in maintaining RAID 1 resilience.
To protect RAID 1 data, implement a robust backup strategy, conduct regular system health checks, and promptly replace failed drives, ensuring stored information’s continual redundancy and integrity.
Steps to Recover from RAID 1 Drive Failure
To recover from a RAID 1 drive failure, you must systematically restore data redundancy and system functionality. Here are the essential steps to guide you through the recovery process:
Identify the Failed Drive: Determine the specific failed drive within the RAID 1 array. Utilize RAID management tools or system logs to locate the affected drive accurately.
Replace the Failed Drive: Safely power down the system.
Remove the failed drive and return it with a new drive of equal or greater capacity.
Initiate Rebuild: Access the RAID controller interface to initiate the rebuild process. It involves transferring data from the functioning drive to the newly installed drive to restore redundancy.
Monitor Rebuild Progress: Regularly monitor RAID management tools for real-time updates on the rebuild process. Ensure synchronization between the new drive and the existing one.
Verify Data Integrity: Once the rebuild is complete, perform data integrity checks to verify the consistency and accuracy of the mirrored data.
Backup Critical Data: As a precautionary measure, periodically back up critical data during and after recovery.
Document the Recovery Process: Maintain comprehensive documentation of the recovery process, including the steps taken, encountered issues, and applied resolutions.
Perform System Tests: Conduct thorough system tests to ensure optimal functioning of the RAID 1 array after recovery: test data access, system performance, and integrity.
Seek Professional Assistance if Needed: In the event of persistent recovery issues or concerns regarding data integrity, consider seeking professional assistance from data recovery services such as PITS Global Data Recovery.
By following these steps, users can effectively navigate the recovery process, minimizing downtime and successfully restoring RAID 1 redundancy in the event of a drive failure.
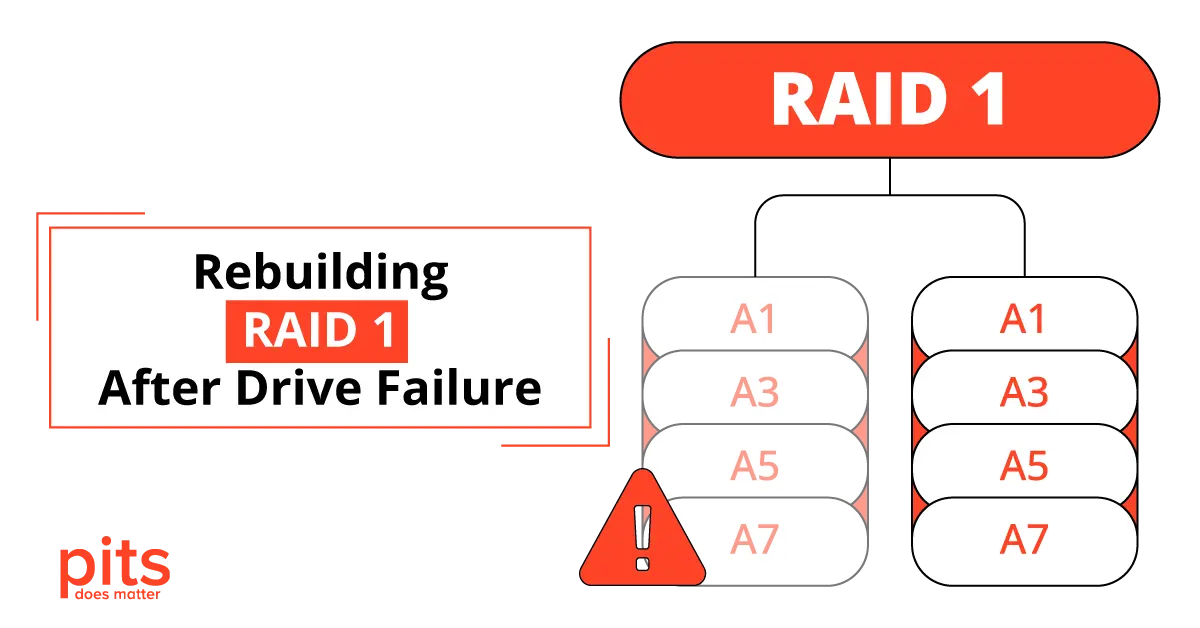
Rebuilding RAID 1 After Drive Failure
Rebuilding a RAID 1 array following drive failure is a critical task to restore data redundancy and preserve the integrity of stored information. The process typically involves:
- Identifying the failed drive.
- Replacing it with a new drive of equal or greater capacity.
- Initiating the rebuild through the RAID controller interface.
Completing the rebuild progress is crucial as the data gets mirrored from the remaining functional drive onto the new drive, making monitoring vital.
Allow the RAID controller to initiate the rebuilding process. The period may vary based on your RAID 1 array size and drive speed. Monitor the progress through the RAID management interface
Best practices during this phase include:
- Maintaining proper cooling to prevent overheating.
- Avoid interruptions to the rebuild process.
- Periodically backing up critical data as a precautionary measure.
After completing the rebuild, conducting comprehensive data integrity checks is crucial to validate the mirrored data’s accuracy. Additionally, updating firmware and software and documenting the recovery process contributes to the overall success and resilience of the RAID 1 setup. By attaching to these steps and best practices, users can effectively overcome the challenges posed by drive failures and restore the redundancy of their RAID 1 configuration.
Why Choose PITS for RAID 1 Recovery
PITS sets itself apart with advanced technology, industry expertise, and a dedication to client satisfaction. Our company utilizes state-of-the-art tools and customized methodologies for RAID 1 recovery, guaranteeing fast and secure retrieval of your valuable data. With transparency and personalized service at the forefront, PITS Global Data Recovery is the trusted choice for resolving RAID 1 drive failures.
Successfully navigating RAID 1 data recovery requires attention and strategic action. A robust recovery strategy, proactive measures, and professional assistance are essential for data integrity. Detecting drive failures, initiating rebuilds, and following manageable steps are key.
In conclusion, for the preservation of RAID 1 setup after a drive failure, it is vital to utilize a combination of proactive methods and strategic recovery procedures. By implementing regular backups, vigilant monitoring, and prompt responses to drive failures, users can reinforce their RAID 1 configurations and mitigate the risk of data loss.
Frequently Asked Questions
Does raid 1 cause hard drive failure?
RAID 1 mirrors information across multiple drives, ensuring data redundancy and minimizing the impact of individual drive failures. While it does not prevent physical drive failures, RAID 1 provides a fault-tolerant configuration that ensures uninterrupted data accessibility even during a single drive failure.
What are the consequences of a RAID 1 failure?
In case of a simultaneous failure of both mirrored drives, there is a possibility of data loss in RAID 1. However, in the typical scenario of a single drive failure, RAID 1 continues to operate using the remaining functional drive, ensuring data accessibility and system continuity. To recover from a drive failure in RAID 1, a new drive is usually inserted to replace the failed one, and the RAID controller initiates a rebuilding process to restore data redundancy.
Does RAID 1 have fault tolerance?
RAID 1 provides data redundancy, ensuring fault tolerance by creating a fault-tolerant array. In a two-disk RAID 1 configuration, the second drive maintains identical data if one disk fails, preventing data loss and facilitating seamless recovery. It effectively achieves fault tolerance.
What is the first step in rebuilding a RAID 1 array after a drive failure?
The initial step is identifying the failed drive using RAID management tools or reviewing system logs. After removing the failed drive, the RAID controller automatically initializes the replacement drive to start the rebuild.
Can I continue using the RAID 1 array while the rebuild progresses?
In most cases, it is generally feasible to continue using the RAID 1 array while rebuilding. It allows for uninterrupted access and utilization of your data, minimizing workflow disruptions. However, it is crucial to closely monitor the rebuild progress to ensure it proceeds as intended. Additionally, exercising caution and being mindful of any potential performance implications during rebuilding is important.