
On Synology, adding a drive to expand storage capacity can significantly enhance your data management capabilities. Whether you are a small business owner striving to safeguard critical data or a tech enthusiast intent on maintaining a robust media library, expanding your Synology storage pool capacity offers a versatile solution. This blog post will guide you through adding a drive to your Synology system, ensuring you can comfortably accommodate your ever-growing data requirements.
Add Drive to Synology - RAID Types Requirements
Add a drive to your Synology system and expand your storage pool successfully by ensuring that your pool is in one of the following RAID types: SHR (Synology Hybrid RAID), RAID 1, RAID 5, RAID 6, or JBOD. Each RAID type offers unique data redundancy and performance advantages, allowing you to select the one that best fits your data storage needs.
While adding drives to a RAID 1 storage pool might seem like a viable method to expand storage capacity, it’s essential to note that this isn’t the case. Unlike other RAID levels, in RAID 1, adding drives does not increase the storage space. Instead, any add-on drives function as mirror drives, duplicating the existing drive’s data.
This replication mechanism bolsters the system’s fault tolerance by providing redundancy – if one drive fails, the data remains readily available on the mirror drive.

This safeguarding feature makes RAID 1 a robust choice when data preservation is paramount, even though it doesn’t expand the storage pool’s capacity.
Drive Compatibility and Capacity Requirements
- Drive Type: The drive should be a SATA (Serial ATA). Synology systems are not compatible with PATA (Parallel ATA) or SCSI (Small Computer System Interface) drives.
- Capacity: The drive’s capacity should equal or exceed the smallest drive in your existing RAID array. In a SHR setup, you can use drives of different sizes, but the smallest drive determines the size of the storage volume.
- Health Status: The drive should be healthy and free of bad sectors. You can check this by connecting the drive to a PC and running a Disk Check or similar utility.
- File System: Format the drive with a system that Synology supports, such as EXT4 or Btrfs. Before adding it to your Synology system, you must reformat the drive if it has a different file system. Please note that reformatting will erase all data on the drive.
- If using SHR, RAID 5, or RAID 6, the new drive must have the same physical sector size (e.g., 512 bytes or 4K) as existing drives in the storage pool.
- The new drive’s firmware version should be similar to existing drives in the storage pool. If not, update the drive’s firmware before adding it to the system.
How to Add a Hard Drive to Synology NAS
Follow these simple steps to learn how to add a hard drive to Synology NAS storage pool and expand its capacity:
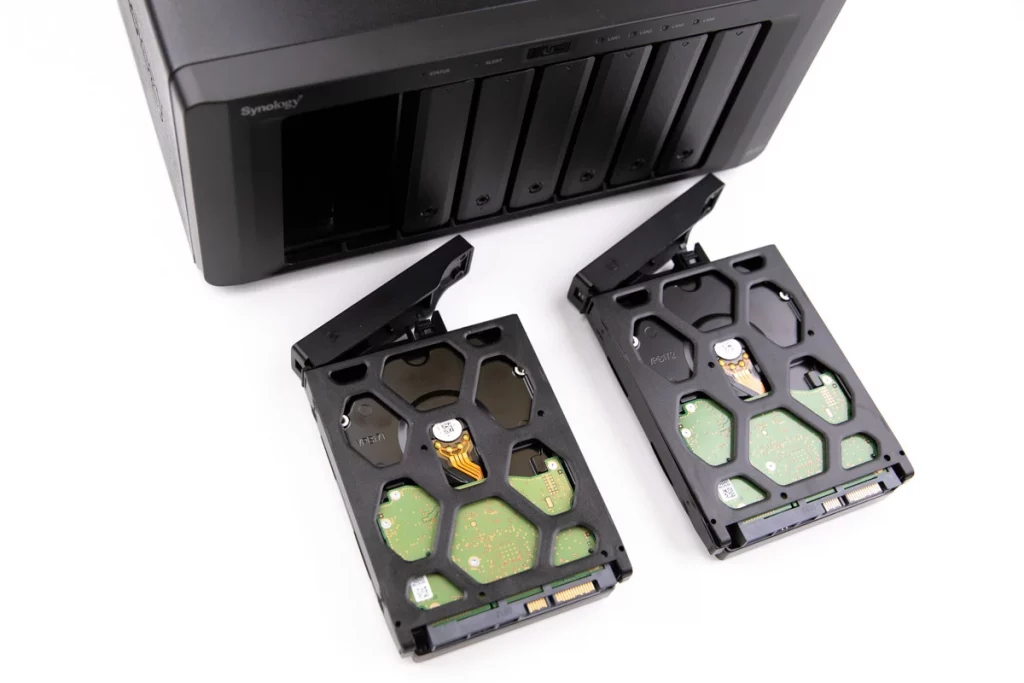
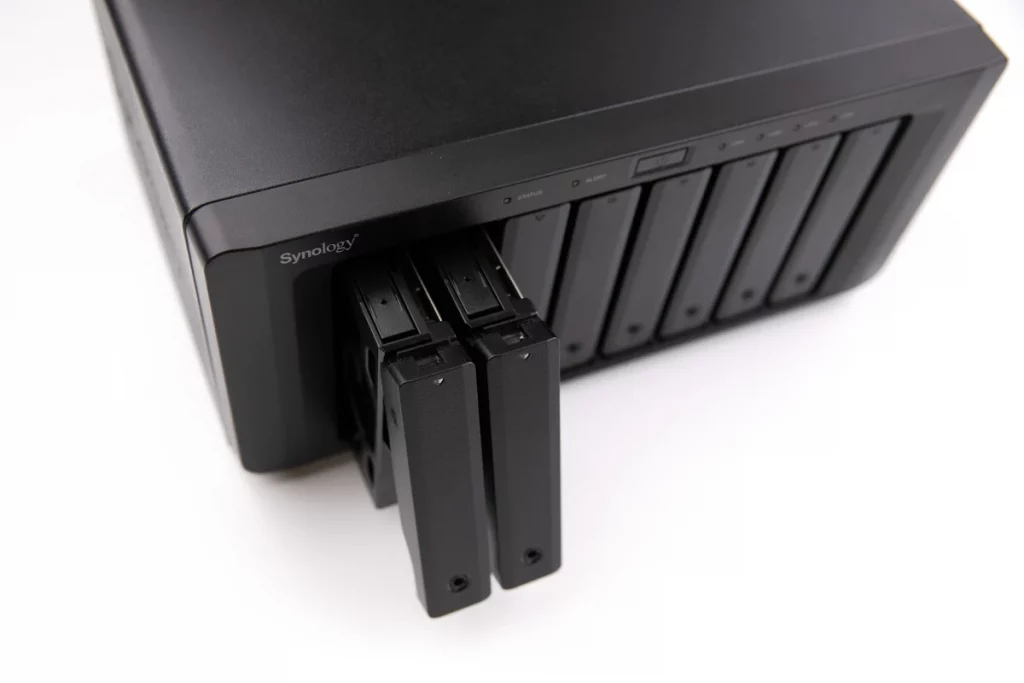
- Power off your Synology system. (You can skip this step if your Synology NAS supports hot-swapping)
- Insert the new drive into an empty drive bay.
- Power your system and log in to the DSM (DiskStation Manager) interface.
- Go to Storage Manager and click Storage Pool from the left menu.
- Choose the storage pool you want to expand by adding a new drive.
- Click Manage and select Add Drives.
- Select the new drive you want to add from the available drives list and click Next.
- Choose the RAID type for your storage pool, click Next, and confirm by clicking OK.
- A warning message will tell you that the newly added drive will erase data. Click OK to proceed.
- Depending on the drive’s capacity, the system will now add the new drive to your storage pool, which may take some time. You can monitor the progress in Storage Manager -> Storage Pool -> Manage.
- Once completed, a notification will appear, showing that the expansion was successful. You can now use the new storage capacity for your expanded storage pool.
Add a New Drive to Synology NAS and Expand the Volume Size
Add a new drive to Synology NAS to increase the capacity of your storage pool. Next, enlarge the size of the associated volume, which can be done automatically or manually, depending on the storage pool type.
Automatic volume expansion automatically detects increased storage capacity and extends the volume size accordingly. On the other hand, manual volume expansion requires the user to initiate the process through the Synology DiskStation Manager (DSM) interface.
By allowing users to choose between automatic and manual volume expansion, Synology provides flexibility to cater to different needs and preferences.
This ensures a seamless and efficient storage management experience, empowering users to maximize their resources.
Single-volume storage pools support automatic volume expansion, while multiple-volume storage pools can be expanded automatically and manually. For SHR or RAID 5/6, all drives must have the same physical sector size to support automatic volume expansion.
Professional Synology Recovery Support
To sum it up, adding a new drive is a simple yet powerful way to expand your Synology system’s storage capacity. With minimal effort, you can quickly complete the expansion process when you have the right compatibility and capacity requirements.
Despite the robustness of Synology NAS systems, they are not immune to failure during the expansion of storage capacity. This can be due to various factors, including hardware faults, power surges, or human error. PITS Global Data Recovery Services stands ready to assist you during such adverse scenarios.
With a wealth of experience in dealing with all RAID levels, PITS Global has the expertise to recover data from Synology NAS, ensuring minimal disruption to your operations. If you’re facing data loss, don’t despair – contact PITS Global Data Recovery Services today for a swift and reliable solution.
Frequently Asked Questions
How do I check the compatibility of a hard drive with my Synology system?
You can check the compatibility by ensuring that the drive is a Serial ATA (SATA) and has a similar physical sector size and firmware version as existing drives in your storage pool.
Can I add a different-sized drive to an SHR setup?
Yes, you can add a different-sized drive, but the storage volume will be based on the size of the smallest drive.
How long does it take to expand a storage pool in Synology NAS?
The time taken to expand a storage pool depends on the capacity of the new drive and your RAID type. It may take several hours for larger drives or more complex RAID types. You can monitor the progress in DSM’s Storage Manager.
Can I add drives while my Synology NAS is powered on?
Some Synology NAS models support hot-swapping, which allows you to add new drives without powering off the system. Check your device specifications to confirm if this feature is supported.
Do I need professional recovery services for my Synology system?
While Synology NAS systems are highly reliable, unexpected events like power surges or human error can cause data loss during storage pool expansion. In such cases, it is recommended to seek professional recovery services from experienced and trusted companies like PITS Global Data Recovery Services.
Can I expand a single-volume storage pool manually?
No, single-volume storage pools only support automatic volume expansion. You can manually expand multiple-volume storage pools through the DSM interface.
Can I use any hard drive for my Synology NAS?
No, using compatible and certified drives for your Synology system is recommended to ensure optimal performance and stability. Make sure to check the compatibility list provided by Synology before purchasing a new drive. Alternatively, you can also use the Synology Drive Selector tool to find compatible drives for your system.